Have a room that’s crying for a face-lift, but you aren’t sure where to begin? Interior painting isn’t limited to just the walls. While any room in your home may appear uninteresting and made of plain old walls, it takes just a little imagination to bring it back to life.
That’s because walls are only one aspect of a room—ceilings, doors, and trim can also help re-energize your living room, bedroom, or any other space. Here’s the step-by-step guide on how to do it yourself!

Plan Your Approach
Get organized before the actual job begins. Most prep work can be done a day or more before you start painting.
Move all furniture out of the room or out of your way. Large furnishings can be piled in the center of the room and covered with drop cloths. If you intend to paint the ceiling, disconnect and remove any chandeliers. You’ll work faster and make fewer mistakes if you don’t have any obstructions to work around.
Lay drop cloths to cover the floor. Designate one area in the room where you can gather the tools you’ll need and mix paint as you work.
Always work from the top down when painting, which helps you to see and correct any drips or runs as you go. If you’re painting an entire room, first paint the ceiling, then the walls. It’s also usually better to paint large areas like walls before repainting the trim; because you’ll work more quickly when covering open areas, this can result in roller spatters, overspray and occasional errant brushstrokes.
Repair Damaged Surfaces
Scrape away old, flaking paint, and lightly sand painted woodwork to “knock down” glossy surfaces and prepare them for new paint. Use a primer-sealer to cover high-gloss enamel paints before repainting.
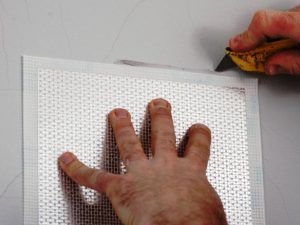
Fix any dents, chips, or cracks in the walls before you start painting. Patch small imperfections with spackling or drywall compound (Image 1). For larger holes and cracks, cut away enough drywall or plaster to be able to create a patch (Image 2). With drywall, you may have to cut until you can find a wall stud in which to nail the patch to. With a plaster wall, bridge the gap with fiberglass tape (Image 3), then spackle over the tape (Image 4). Allow the patches to dry, then sand smooth. Use a damp sponge to wash the dust off the walls before painting.
[vc_row][vc_column][vc_custom_heading text=”
Prep the room” font_container=”tag:h3|text_align:left|color:%23222222″ use_theme_fonts=”yes” el_class=”text-transform” css=”.vc_custom_1502167026073″][/vc_column][/vc_row]
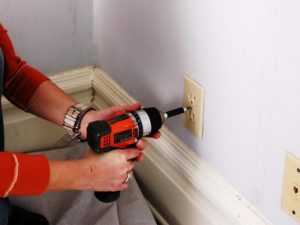
Remove all electrical switch and outlet covers, wall sconces, picture hangers and any other wall fixtures or attachments (Image 1). Keep track of outlet screws by taping them to the covers as you go.
Use painters tape to mask around windows and woodwork such as baseboard, ceiling moldings and door frames (Image 2). Quality painters tape is superior to ordinary masking tape and worth the extra expense — it leaves a sharper paint line and is easier to remove, especially if left in place too long or in direct sunlight. When you apply the tape, run a plastic tool over the edge to fasten it firmly and keep the paint from seeping underneath it (Image 3).
Paint only on clean, dry surfaces. If the weather is damp, close all windows and run an air conditioner or dehumidifier before painting, or just wait for more favorable conditions. Most paints sold today are lower in volatile organic compounds (VOCs) and less noxious than paints that once contained strong solvents and emitted dangerous fumes, but good ventilation in the work area is still important. While you work, open windows or run fans to provide a constant supply of fresh air, which will also help to dry the paint more rapidly.
[vc_row][vc_column][vc_custom_heading text=”
Prep the Materials” font_container=”tag:h3|text_align:left|color:%23222222″ use_theme_fonts=”yes” el_class=”text-transform” css=”.vc_custom_1502167026073″][/vc_column][/vc_row]
When you purchase your paint, ask what type of brush and roller is right for your job. Rollers have different naps, or fiber lengths that correspond with different types of paint and desired finishes. In general, the rougher the surface, the longer the roller nap should be. Synthetic brushes and rollers are generally used with latex or water-based paint. Oil-base and alkyd paints usually call for natural or synthetic brushes and rollers. Your paint dealer will guide you to the right combination of tools and materials for your project.
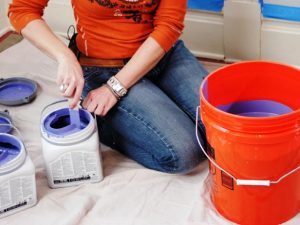
If your job requires several gallons of paint, avoid color variations from can to can by opening all of the cans and mixing, or “boxing,” them together in a separate container. While you work, use a paint stick to mix the paint frequently, giving it a good stir from the bottom up to prevent the pigments from settling.
To keep paint from building up in the paint can rim and spilling over the sides, use a hammer and nail to punch a small hole in the interior rim of the can, this will allow excess paint to drain back into the can.

[vc_row][vc_column][vc_custom_heading text=”
Using a Brush” font_container=”tag:h3|text_align:left|color:%23222222″ use_theme_fonts=”yes” el_class=”text-transform” css=”.vc_custom_1502167026073″][/vc_column][/vc_row]
Brushes come in many shapes and sizes. Wall brushes are 3 to 4 inches wide and designed for large, flat expanses. Trim brushes have a 2- or 3-inch-wide straight edge and are a good choice for doors and window frames (Image 1). Sash brushes have tips cut at an angle and are usually 1-1/2 inches wide, making them ideal for detailed areas and “cutting in”, a term that describes painting freehand around obstructions or along contrasting painted surfaces (Image 2). Cutting in takes practice and a steady hand, but it is easy to learn with experience.
Load a brush by dipping the bristles one-third of the way into the paint. Lightly pull the brush back against the inner edge of the paint can or bucket, using the edge to squeegee off the excess paint on the bristles’ surface. Try to make long, smooth brushstrokes to avoid streaks and brush marks.
[vc_row][vc_column][vc_custom_heading text=”
Using a Paint Roller” font_container=”tag:h3|text_align:left|color:%23222222″ use_theme_fonts=”yes” el_class=”text-transform” css=”.vc_custom_1502167026073″][/vc_column][/vc_row]
When painting (especially ceilings), cover your hair with a scarf or baseball hat and wear protective eyewear to guard against spatters and drips. An extension pole screwed onto the paint roller handle will help you reach overhead areas.
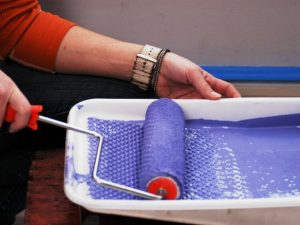
Use a 12-inch roller with a nap length that matches the type of paint and finish you want. Do not overload the roller with paint—fill the well of the roller tray and dip the roller in halfway, then roll it back onto the tray’s angled platform to remove excess paint (Image 1). Apply paint first in an overlapping vertical “W” pattern, then re-roll this area horizontally, working in a space about 3 to 4 feet square (Image 2). Refill the roller and begin your next application outside the painted area, rolling back into the wet paint as you work.
Cover all areas of the wall and try to avoid missed spots. Don’t worry if the first coat looks thin, appears lighter than the color you chose, or doesn’t completely hide the original paint. A second application is usually required to provide a uniform, finished coat that accurately matches the color you purchased.

[vc_row][vc_column][vc_custom_heading text=”
Paint the Trim” font_container=”tag:h3|text_align:left|color:%23222222″ use_theme_fonts=”yes” el_class=”text-transform” css=”.vc_custom_1502167026073″][/vc_column][/vc_row]
Once the walls are dry, remove the painter’s tape from the trim. Peel it off slowly and evenly to make sure it doesn’t pull up any paint (Image 1). Or try a blast of hot air from a heat gun or hair dryer, it will loosen the tape bond to prevent it from sticking to the finish.
After the tape is removed from the trim, it’s time to tape around the trim. Begin painting the trim closest to the ceiling and work your way down (Image 2). Paint door and window frames before the baseboards. Use a 1-1/2″ angled sash brush on narrow trim and a 2-1/2″ flat brush on wide trim such as baseboards. Minimize your brush strokes and don’t over work the paint. If a second coat of paint is required on the trim, make sure the first coat is completely dry before starting the second. Carefully remove the tape once the second coat is dry.

[vc_row][vc_column][vc_custom_heading text=”
Clean Up” font_container=”tag:h3|text_align:left|color:%23222222″ use_theme_fonts=”yes” el_class=”text-transform” css=”.vc_custom_1502167026073″][/vc_column][/vc_row]
If you need to take a break during your project, wrap brushes and rollers with plastic wrap to keep them wet and pliable for up to a day or more. When you’re ready to work again, simply unwrap them and resume painting.
Paint rollers are inexpensive and disposable, but brushes are costly and worth saving, and they can be used many times if given proper care and cleaning. To make brush cleaning easier, drill a 1/4-inch hole just above the metal ferrule, then insert a wire or large nail into the hole. Suspend the brush over a jar or other container filled with enough water or paint solvent to cover the bristles. Let it soak for a while, then rinse and dry the bristles with a clean rag. Wrap the brush in plastic wrap or place the brush in its original package to keep the bristles straight.
Happy Painting!
- Via: www.diynetwork.com